A regular expression digression
The regular expression is contained within the two forward slashes, and looks like this: /^\((.+)\)$/. The first character, ^, indicates that what follows needs to appear at the beginning of the string. It's followed by two characters, \(, which look for an opening parenthesis. The back-slash escapes
the character that follows, telling the regular-expression parser to
treat it literally. This is necessary because parentheses are among the
characters that have special meaning in regular expressions, as we'll
see next. The next four characters, (.+), look for one or more (represented by +)
characters of any kind within the same line (represented by.) and put
them in a group by use of the parentheses. The final three characters, \)$,
look for a closing parenthesis at the end of the string. So, all
together the regular expression is selecting an opening parenthesis,
followed by a group of characters, and ending with a closing
parenthesis.
The .replace()
method looks within a particular context for a string represented by a
regular expression and replaces it with another string. The syntax
looks like this:
'context'.replace(/regular-expression/, 'replacement')
The context strings of our two .replace() methods are the variables requiredKey and conditionalKey.
We've already looked at the regular expression part of this, contained
within the two slashes. A comma separates the regular expression and
the replacement string, which in our two cases is'$1'. The $1 placeholder represents the first group
in the regular expression. Since, again, our regular expression has one
group of one or more characters, with a parenthesis on either side, the
replacement string will be everything inside, and not including, the
parentheses.
Inserting the field-message legend
Now that we've
retrieved the field messages without the parentheses, we can insert
them, along with their corresponding flags, above the form:
$(document).ready(function() {
var requiredFlag = ' * ';
var conditionalFlag = ' ** ';
var requiredKey = $('input.required:first')
.next('span').text();
var conditionalKey = $('input.conditional:first')
.next('span').text();
requiredKey = requiredFlag +
requiredKey.replace(/^\((.+)\)$/,'$1');
conditionalKey = conditionalFlag +
conditionalKey.replace(/^\((.+)\)$/,'$1');
$('<p></p>')
.addClass('field-keys')
.append(requiredKey + '<br />')
.append(conditionalKey)
.insertBefore('#contact');

});
The five new lines should look relatively familiar by now. Here is what they do:
1. Create a new paragraph element.
2. Give the paragraph a class of field-keys.
3. Append requiredKey and a line break to the paragraph.
4. Append conditionalKey to the paragraph.
5. Insert the paragraph and everything we've appended inside it before the contact form.
When using .append()
with an HTML string, as we do here, we need to be careful that any
special HTML characters are properly escaped. In this case, the .text() method we used when declaring the variables has done this for us.
When we define some styles for .field-keys in the stylesheet, the result looks like this:
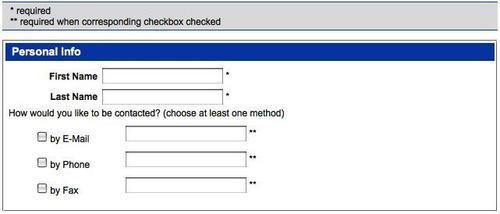
Our jQuery work for the first fieldset is almost complete.